The backstrap loom is an ancient technology. It is considered, along with a simple frame loom, to be one of the original looms with which humans made cloth. It is known that humans were weaving cloth in the Stone Age in the earliest agricultural villages. However, it really is not known whether or not humans wove even earlier than that. Cloth and looms are made of materials that easily disintegrate over time, so archeologists can only guess at the beginnings of this craft. It is known that weaving predates pottery.
It is thought that early treadle looms of China evolved from the original backstrap loom. Backstrap looms were used by the ancient Maya; the fact that the ancestors of these ancient Maya still use backstrap looms today speaks to this loom’s functionality and importance. Backstrap looms, indeed, have been used throughout the world, and very early in human history.
The simple technology of the backstrap loom, consisting of not much more than sticks, yarn and the weavers’ body itself, is deceptively primitive. Both simple and complex textiles can be woven on the backstrap loom. Because the loom is so simple, there are infinite levels of intricacy that are possible. More mechanized looms like treadle looms and rigid heddle looms are much more limited in weave structures because of their mechanizations.
There are plusses and minuses to weaving on a backstrap loom. The weaving width on a backstrap loom is limited to how far a weaver can reach while strapped into the loom. Very stretchy and/or fuzzy yarns are difficult to work with on a backstrap loom. Also, every weaving on the backstrap loom needs to be set up individually. However, this loom can be rolled up, weaving and all, and taken almost anywhere. The backstrap loom is such a simple piece of equipment that anyone with interest and a little dedication can make one for very little cost.
Making your own backstrap loom is not an incredibly difficult project, but there are varying levels of time investment required. To gather your own sticks from the wild will take quite a bit longer than just buying dowels at a hardware store. And making your own batten will take quite a bit longer than buying one already made. I find it is absolutely worth the time it takes to make these things. There is something about weaving on a loom made of sticks I found myself in the forest that is incredibly satisfying.
That being said, if you want to get weaving right away you can buy a starter loom here. Keep in mind that you can never have enough loom parts! Serious weavers often have a collection of many sizes of loom bars, shed sticks and battens to accommodate different sizes and styles of weaving. You can create more parts for your loom as you need them by following these instructions.
But if you love the idea of making your own loom, as I do, and you are willing to spend a little time doing it, these instructions are all you need!!
How to Make Your Own Backstrap Loom

These are the basic parts needed to create a backstrap loom. Some things can be substituted. Following is an explanation of how to make or acquire each of these pieces.
Loom Bars:
I like to use 2 square bars, and one round bar; however, this is not necessary. It also is not traditional anywhere as far as I know. I assume this is because traditional looms are made from found wood, which does not come in square. The bars can be all round or all square. I like to use 2 square bars in my set up because they make rolling my weaving up while weaving a little easier. These bars should be at least 24” long, and very straight. They should be about 1” in diameter. If they are much shorter than 24”, it will be impossible for the backstrap to hold them while wrapped around the weaver’s waist. The loom bars should be at least as wide as the weaver’s hips. If a weaver wants to weave wider than 24”, the loom bars must be a little longer than the width of the weaving. It is difficult to weave that wide on a backstrap loom, especially for a beginner. I recommend learning to weave on the backstrap loom with a fairly narrow weaving -not wider than 8”, most people start with a very narrow belt, 2”- 3” wide. If the bars are thinner than 1” in diameter, they are in danger of breaking under tension. If they are much thicker than 1” in diameter they are a bit klunky and awkward. Thicker is better than thinner though.
The easiest way to make the loom bars is to buy dowels from a hardware store and cut them to size. (Often you can get them cut for you at the hardware store). I buy 48” dowels and cut them in half. If you want to use square dowels, you have to buy these at a hardware store. Ask for 1” x 1” lumber, I usually find it with molding and cabinet making supplies.
You can also forage for wood to make bars. You should keep in mind that it is difficult to find pieces of unprocessed wood that are straight enough for this purpose. Finding branches or small trees that are straight and long enough for loom bars may be the most time-consuming part of making your loom. It really depends on where you are gathering. Extreme care must be taken in doing this gathering responsibly!! Do not cut a live tree or branch if you do not have permission to do so. Look for wood in areas that need thinning and take only what you will use!!! Sometimes recently thinned areas (especially in the Western United States where thinning is necessary to prevent catastrophic forest fires) have freshly cut small trees and brush piled up before it is hauled away. These can be great places to gather loom bars and shed sticks. Hardwood is best to use for loom bars. However, soft woods are usually ok. Mountain mahogany, maple, aspen and juniper are some examples of good woods to be foraged for loom bars. Really, whatever kind of wood that grows very straight. It is best to cut the wood while it is still alive. Dead wood on the ground will likely be weak and easily broken, unless it is recently cut or fallen from a live tree. If you are not sure if a piece of wood that you find lying on the ground is fresh enough to use, peel some of the bark off. If the wood underneath is still a little damp, the wood is fresh enough!! If it is bone dry under the bark, it has likely been sitting dead for too long to be useful as a loom bar.
Bark should be peeled off natural wood bars. It is much, much easier to peel a piece of wood when it is freshly cut, than it is to peel wood that has been cut even a few days before. I recommend peeling your bars right after you cut them! A sharp knife is good for this task (peel away from the body, never toward). Any knots or bulges from small branches should be carved until smooth. This can be time consuming. But if you take the time to do this carefully with a sharp knife, you will have loom bars that will last for generations!
Hardware stores often only carry pine or poplar dowels (soft woods); but these are acceptable, one should just be aware that tremendous tension over time may break them. (I have broken a few loom bars in my day, but it doesn’t happen often).
The ends of the bars can be carved as shown in the picture with a chisel or wood carving tools. The easiest way to do this is to use a vice grip to hold the bar very tightly and carve with a chisel and a hammer. If you do not have these tools, bars can also be carved with a sharp knife or a smaller chisel. I like to use a heavy-duty utility knife.

I start carving by scoring a circle around my loom bar, about 1.5” away from the end.

Then I gently carve little bits of wood away from the scored line. I score the circle line again, and carve a little more away from it.
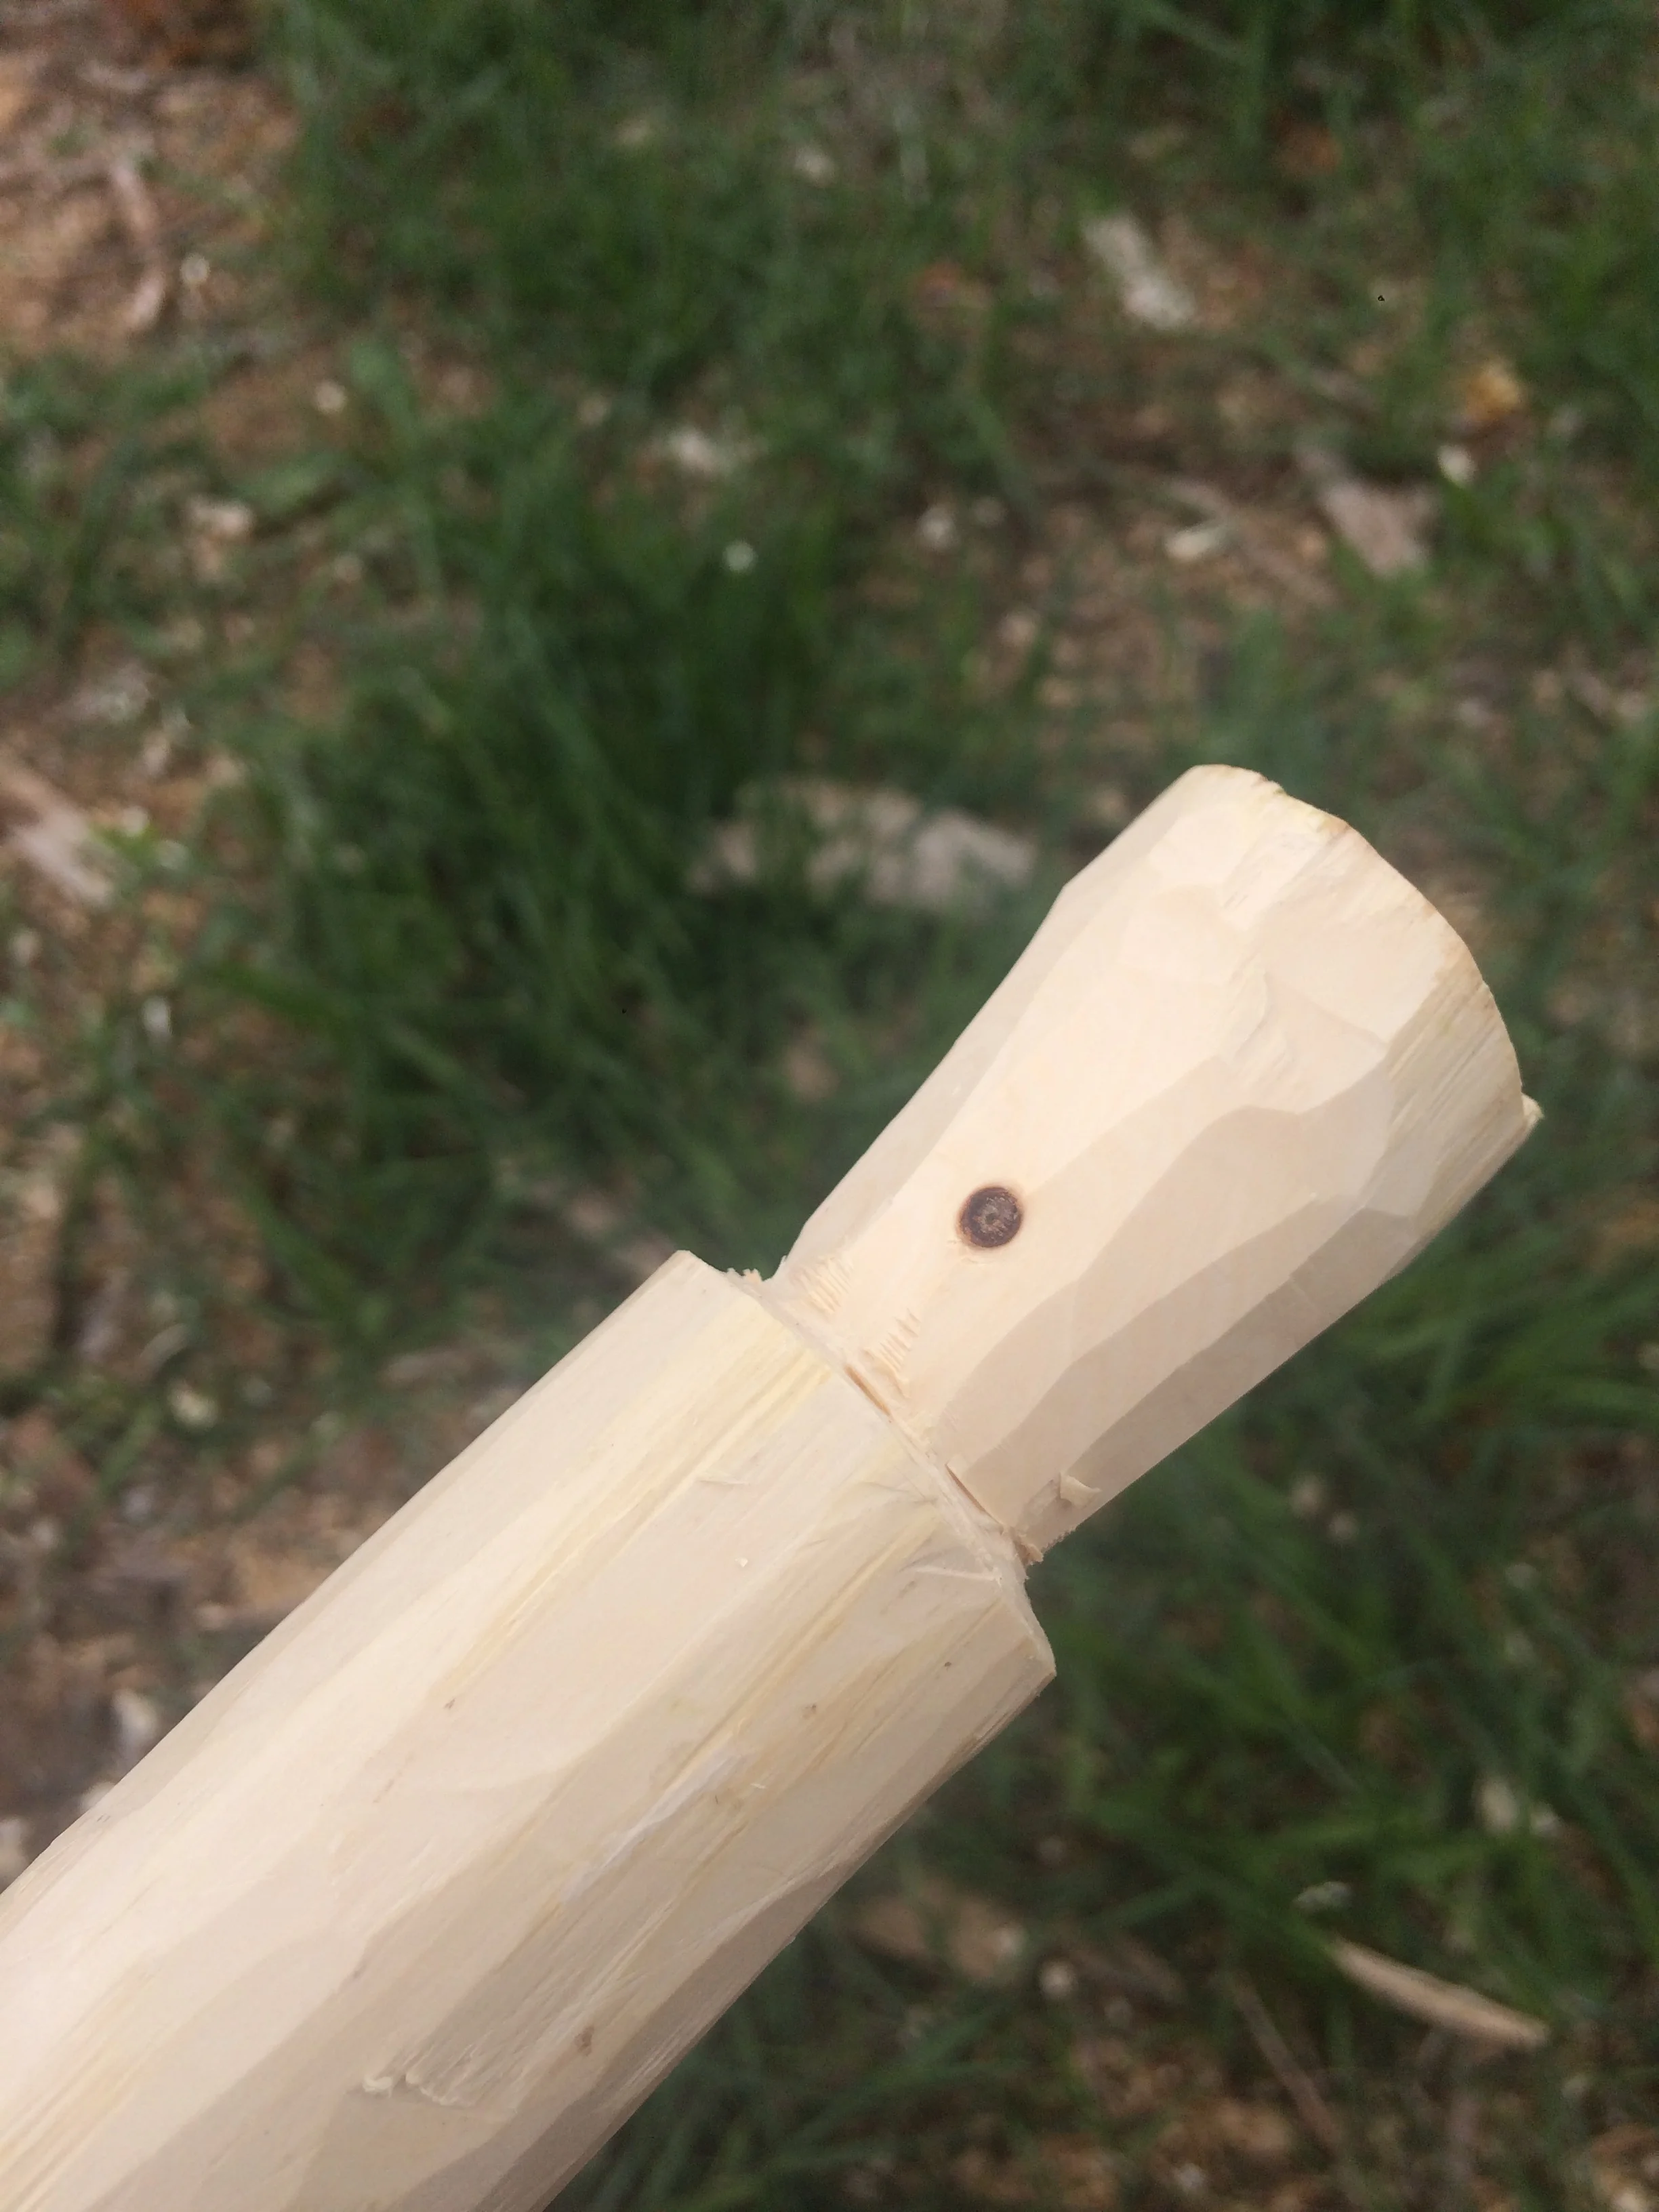
I repeat this process, carving gently to prevent carving past the score line, until the end of my loom bar has the shape I want.
Be sure to always carve away from all parts of your body. Never carve towards your hands or other body parts. It is definitely possible to weave without the ends carved this way, but the carved ends help keep everything in place while weaving.
Loom bars should be sanded until they are very smooth, whether they are made from dowels, or foraged wood. If bars are not well sanded, it is easy for yarn to catch on splintery areas. This can damage yarn and make weaving difficult.
NOTE: It is not necessary to oil any of the wooden pieces of your backstrap loom. Excess oil on the wood may damage your weaving. The pieces will become naturally polished with time and use, just from the oil in your hands and friction of weaving.
Shed Sticks:

The stick on the left is made from a 1/4” dowel. The two sticks on the left are made of wildcrafted mountain mahogany sticks.
If you are a beginner weaver you should start with shed sticks that are not longer than 12”. Once you are more experienced and want to weave wider, you will need longer shed sticks. But sticks that are too long will be very cumbersome when weaving narrow pieces. Shed sticks should be between 1/4” and 3/8” in diameter. Anything thinner will be in danger of breaking. Anything wider will be awkward on the loom. The shed sticks can be made the same way as the loom bars. It is easier to forage and find appropriate shed sticks than it is to find loom bars. It is usually possible to find some good shed sticks among small, woody shrubs and tree branches. Again, peel them right away. I use a small wood carving chisel to carve the ends of my shed sticks. I do not use a vice for these, as they are so small and can be a bit delicate. If you have found some good wood for your shed sticks, you will find that it is a little bit pliable at first and becomes more rigid with time.
Picking Stick:
The picking stick is used for more advanced weaving techniques. It can be made of a store-bought dowel or a found stick. The picking stick should not be longer than 10”. It can be as short as 6”. It should not be thicker than 1/4” diameter. It can be much thinner, so long as the wood is strong and does not easily break. It is not as critical for the picking stick to be absolutely straight. Find a stick that feels good in your hand. Again, an old stick that has been on the ground for a while will probably be too weak for this purpose. Use something freshly cut. The ends of the picking stick should be carved into points, and it should be well sanded.

I like to make the points on my picking sticks kind of flat on one side.
Batten:
A beginner weaver should start with a batten that is not longer than 24”, a bit shorter than that is ideal. Your batten should be at least as long as the width of your weaving, but not too long, or it will be very awkward to use. It should be about 1 ¼” – 1 ½” wide and about 3/8” – 1/2” thick on the flat edge. It is harder to forage for an appropriate piece of wood for a batten, because it needs to be fairly wide and flat. It would take quite a bit of carving to make one from a foraged natural piece of wood. But if you are a good carver, there is no reason you could not give it a try. The easiest way to make your own batten, though, is to buy a piece of molding from a hardware store. Hardware stores usually carry lots of styles of molding. It is best to find a molding that is flat on one edge and sloped on the other. Then you will need to cut the molding to the length you want and carve it. One of the long edges should remain fairly flat, and the other should be as thin as possible. You should sand your batten well. There are many nice, hand-made battens for sale on Etsy and other places on the internet. Battens made for Navajo style weaving are usually very nice for backstrap weaving.
You can use an electric sander to sand all of your looms parts if you want. But you can get the job done with just a piece of sand paper or two.
Backstrap:
It is best to weave your own backstrap! (This is the second project in “A Loom Made of Sticks: An Online Class in Backstrap Weaving.” However, you need something to use as a backstrap before you can weave your own! An easy and inexpensive thing to do is to just use a piece of rope with loops on the end. Place a folded-up towel around your back underneath the rope to make it more comfortable. When you wrap your backstrap around your lower back, the loop on each end should come out just past your hips.
If you like to sew, you can sew a backstrap fairly easily. Make a fabric rectangle with at least two layers of fabric long enough to cover most of your lower back. Sew a loop made of fabric or rope on each end of the rectangle. If the loops of your backstrap do not reach past your hips, you can add a loop of rope to each end to make it the necessary length. You do not want the loops to come out much farther than your hips, it will make weaving difficult. Backstraps made of cloth should be made of a few layers of fabric sewn together. In my experience cloth backstraps are not as strong as woven ones and tend to rip over time because they are under quite a bit of tension. However, they work just fine!!

A handwoven backstrap. This is a project in “A Loom Made of Sticks: An Online Class in Backstrap Weaving.”

A backstrap sewn out of cloth.
Tapestry Needle:
Tapestry needles are used in the loom set up process. These can be found in fabric stores, weaving supply stores, knitting stores or online. Blunt-tipped needles are easier to use than sharp-tipped ones. A sacking needle would also work. It is best to use a metal needle. However, there are plastic needles like this that work ok.
Rubber Bands:
It is good to have a bag of these in your weaving set up!!
Sand Paper:
It is good to have a piece of sand paper with your weaving set up. It is useful to have handy if you find that a loom bar or shed stick is catching on your yarn anywhere.
Nylon Cord:
Nylon cord is used to make your string heddles. It should be flexible and easy to tie a knot in. Fishing line is not good for this purpose because it tends to wear away at yarn while weaving. It is ideal if you can find nylon cord that is slightly textured. Loosely spun nylon cord can be a pain to use, but it will do if it is all that you can find.
Cotton Twine:
Cotton twine is used to set up the loom. It should be a fairly thin cotton twine that does not easily break.
Rope:
You will need some strong, cotton rope like clothesline size. This is easily available at hardware stores. You will use this to tie your back loom bar to something stable like a tree. The rope should not be so thick that you cannot easily tie a loop in it.
Warping Pegs:
If you do not have the tools to make your own warping pegs, I recommend getting a set of steel stakes. The stakes that you want to get are used for laying out foundations in building. They are available at hardware stores. You are looking for ¾” x 36” (or 48”) steel stakes with one pointy end. These stakes have ¼” holes in them. You will pound these stakes into the ground to use them. You can use 2 stakes to wind very simple warps, but you will want 4 stakes to do more complicated, multicolored warps.
NOTE: A steel stake can also be used to anchor the far end of your loom if there is nothing else available. I recommend bringing a steel stake if you are going to weave on a beach with no trees, for example. However, these steel stakes are very heavy and difficult to pack in luggage for airplane travel.
If you want to make wooden warping pegs, you need to use a drill press. Warping pegs must be made of hardwood. Soft woods like pine do not work for this purpose. You will need two pieces of a hardwood board. One should be at least 2.5” wide x 4” long, the other should be at least 2.5” wide x 8” long. These boards should be at least 3/4” thick. You will need 2 dowels of 1” in diameter that are each 6” long. You will need 2 dowels ½” in diameter that are also 6” long. Sand your boards well before you begin. In the smaller board drill a 1” hole with a drill press right in the middle of the board. In the larger board drill a one-inch hole about 1” from one end of the board (in the middle of the board’s width). Then drill 2 holes that are ½”. One ½” hole should be at least 3” away from the 1” hole. The second ½” hole should be about 2” away from the first 1/2” hole. Put a little wood glue in each hole, then pound in the dowels. The dowels should fit so snuggly that you need to use a hammer to get them in their holes. Wipe off excess glue and allow the glue to dry.
C-clamps
C-clamps are used for warping with warping pegs, and for anchoring the far end of your backstrap loom to a windowsill, counter or table top.
You won’t need c-clamps if you don’t plan on needing to anchor the far end of your loom to a windowsill, counter or table top. You don’t need c-clamps to anchor the far end of your loom to a post or to a tree. You also do not need c-clamps to warp with steel stakes. I always bring c-clamps with me when I travel with my loom. They come in handy if I want to weave in a hotel room, or a house with no posts in it.
C-clamps should be big enough to clamp your warping pegs to a table top. I find they need to be at least 3”. They should be bigger if you are using a thick table top. They are easily available at hardware stores and online.
Now to Weave!!
There are some great resources that can help you learn to weave on a backstrap loom. Here are some that I recommend :
A Weaving, Spinning and Dyeing Book by Rachel Brown
And of course, my class! A Loom Made of Sticks: An Online Class in Backstrap Weaving